Sunday, March 15, 2009

Stop waiting in Rapidshare.com for Download !!!!!

Go to page you want to download
Select free button
In address bar put: javascript:alert(c=0)
click Ok on pop up
Thats all... 

Thursday, March 12, 2009

Set Up Google Synchronisation for your Nokia S60V3 Phone


Nokia N-Series or E-Series (Symbian S60 3rd Edition)


To set up Google Sync on a Nokia N-Series or E-Series phone (Symbian S60 3rd Edition), please follow these steps:

Note: The images below may vary slightly from the images on your particular phone.
  1. Open your Contacts application
  2. Select 'Synchronization > Settings' from the 'Options' menu. This will open the Sync application.
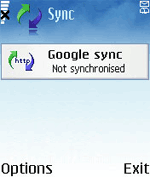
  3. Sync application

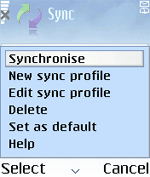
  4. From the Options menu select 'New sync profile'
  5. New sync profile

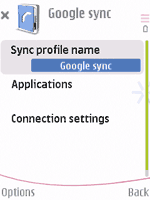
  6. Choose any name you like for 'Sync profile name'
  7. Sync profile name
  8. Select and click 'Applications'
    Note: You will see a list of all content types that your phone can synchronize; however, currently Google Sync only supports Contacts.
  9. Select and click 'Contacts'
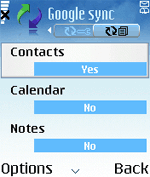
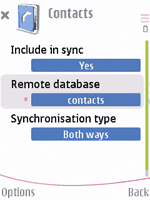
    • Make sure the 'Include in Sync' option is set to 'Yes'
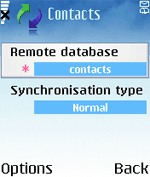
    • Define the 'Remote Database' option as 'contacts'. It needs to be spelled exactly like this (lower case), or Google Sync will not work.
    • Remote database

    • Click 'Back' to exit this screen and save your settings
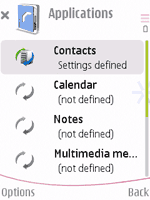
    • Ensure that only Contacts have 'Settings defined' and all other content types say 'Sett. not defined'
    • Settings defined

  10. Click 'Back' to exit this screen and save your settings
  11. Select and click 'Connection Settings'
  12. Enter the following values:
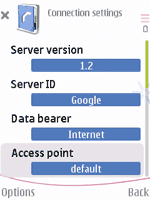
    • Server version: 1.2
    • Server ID: Google (capital 'G' is important)
    • Data bearer: Internet
    • Access point: the Internet access point for your carrier.
    • Server version, server ID, data bearer, access point

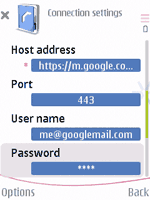
    • Host address: https://m.google.com/syncml (Important to enter https for a secure connection)
    • Port: 443
    • User name: your Google Account username, e.g. you@googlemail.com
    • Password: your Google password
    • Leave other values unchanged
    • Host address, port, user name, password

  13. Click 'Back' to exit this screen and save your settings
  14. Click 'Back' again to exit the Sync profile settings
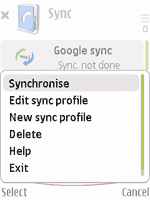
  15. Highlight the your Sync profile and select 'Synchronize' from the 'Options' menu to synchronize your contacts with Google
  16. Synchronise


Wednesday, February 18, 2009

Set Up Google Synchronisation for your Windows Mobile

Sync: Set Up Your Windows Mobile Phone


To set up Google Sync on your Windows Mobile device, please follow the steps below.

Important Note: Make sure that you have backed up any Contacts and Calendars from your phone to your computer before proceeding.

Getting Started

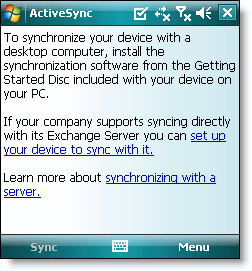
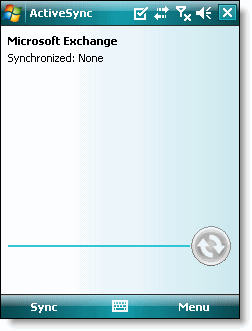
1. Open the Active Sync application on your device's home screen.
2. Click the link Set up your device to sync with it.
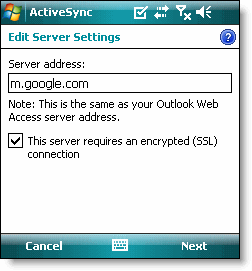
3. Enter m.google.com as the server address.
4. Ensure that the SSL option is checked.


Sign In to Google Account

5. Click Next.
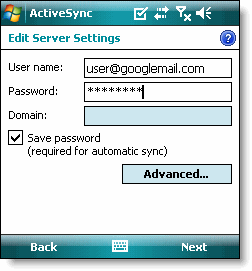
6. Enter your full Google Account email address as the User name.
7. Enter your Google Account password as the Password.
8. Leave the Domain field empty. If your device requires you to enter a domain name, enter google.
9. Click Next.
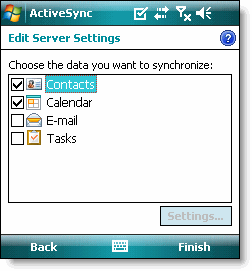
10. Check only Contacts and Calendar.
11. Click Finish.


12. Press the Sync softkey on the left to synchronize.

You've now set up Google Sync for your Windows Mobile device.

Tip: If your business, school, or organization uses Google Apps, your administrator will first need to enable ActiveSync before you can take advantage of this feature.

Set Up Google Synchronisation for your Nokia S60 Phone

Device Set Up Instructions: Nokia 6630 (Symbian S60)


To set up Google Sync on a Nokia 6630 (Symbian S60 2nd Edition) phone, please follow these steps:

Note: The images below may vary slightly from the images on your particular phone.
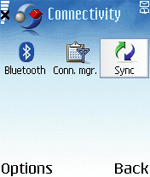
  1. Click Menu key and open the Connectivity folder.
  2. Launch the Sync application.
  3. Sync app in Connectivity folder

  4. From the Options menu select New sync profile
  5. New sync profile

  6. If you are asked to copy the values from another profile, click No
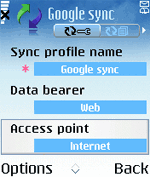
  7. Enter the following values:
    • Sync profile name: Google Sync (or a name of your choice)
    • Data bearer: Web
    • Access point: the Internet access point for your carrier
    • Profile name, data bearer, access point

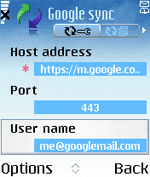
    • Host address: https://m.google.com/syncml (Important to enter https for a secure connection)
    • Port: 443
    • User name: your Google Account username, e.g. you@googlemail.com
    • Host address, port, user name

    • Password: your Google password
    • Leave other values unchanged
  8. Click the 'right' on the central navigation key
  9. Highlight and click Contacts and change the option to Yes
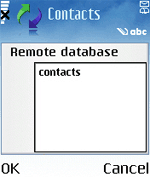
  10. For Remote data base enter contacts (lower case)
  11. contacts lower case

  12. Leave Synchronization type set to Normal
  13. Sync type is normal

  14. Click Back to exit this screen and save your settings
  15. Make sure that all other content types are set to No
  16. Only contacts set to yes

  17. Click Back to exit this screen and save your settings
  18. Highlight your new sync profile and select Synchronize from the Options menu
  19. Exit and save

    Select synchronise


Set Up Google Synchronisation for your Nokia S60V3 Phone


Nokia N-Series or E-Series (Symbian S60 3rd Edition)


To set up Google Sync on a Nokia N-Series or E-Series phone (Symbian S60 3rd Edition), please follow these steps:

Note: The images below may vary slightly from the images on your particular phone.
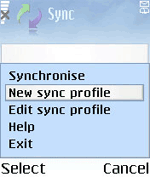
  1. Open your Contacts application
  2. Select 'Synchronization > Settings' from the 'Options' menu. This will open the Sync application.
  3. Sync application

  4. From the Options menu select 'New sync profile'
  5. New sync profile

  6. Choose any name you like for 'Sync profile name'
  7. Sync profile name
  8. Select and click 'Applications'
    Note: You will see a list of all content types that your phone can synchronize; however, currently Google Sync only supports Contacts.
  9. Select and click 'Contacts'
    • Make sure the 'Include in Sync' option is set to 'Yes'
    • Define the 'Remote Database' option as 'contacts'. It needs to be spelled exactly like this (lower case), or Google Sync will not work.
    • Remote database

    • Click 'Back' to exit this screen and save your settings
    • Ensure that only Contacts have 'Settings defined' and all other content types say 'Sett. not defined'
    • Settings defined

  10. Click 'Back' to exit this screen and save your settings
  11. Select and click 'Connection Settings'
  12. Enter the following values:
    • Server version: 1.2
    • Server ID: Google (capital 'G' is important)
    • Data bearer: Internet
    • Access point: the Internet access point for your carrier.
    • Server version, server ID, data bearer, access point

    • Host address: https://m.google.com/syncml (Important to enter https for a secure connection)
    • Port: 443
    • User name: your Google Account username, e.g. you@googlemail.com
    • Password: your Google password
    • Leave other values unchanged
    • Host address, port, user name, password

  13. Click 'Back' to exit this screen and save your settings
  14. Click 'Back' again to exit the Sync profile settings
  15. Highlight the your Sync profile and select 'Synchronize' from the 'Options' menu to synchronize your contacts with Google
  16. Synchronise


Monday, December 15, 2008

How to Speed up your Mozilla Firefox

You want to do fast the web pages loading. There are different types of handlings with webpages in different types of web browsers. Here we will discuss the process to speed up the web page loading with Mozilla Firefox and Microsoft Internet Explorer. Making the easy changes you can save your browsing time 4X.


You have to follow the easy steps demonstrated below:

To speed up Mozilla Firefox:


  • 1. Go to Start Menu and open Mozilla Firefox.

  • 2. In the address bar type about:config and press Enter.

  • 2. In the Filter search bar type network.http.pipe (Filter Search bar will be on top).

  • 3. Change the value of network.http.pipelining string to true double clicking on it. In case of using a proxy, do the same.


  • 4. Change the integer value of network.http.pipelining.maxrequests string to 35 by double clicking on it.

  • 5. Anywhere on the Configuration screen right click and select from the right click menu New -> Boolean.

  • 6. Put the Boolean name as browser.turbo.enabled and click Ok. Set the value of the Boolean to true.

Sunday, November 30, 2008

Switzerland

Switzerland comprises three basic topographical areas: the Swiss Alps, the Swiss plateau or "middleland", and the Jura mountains along the northwestern border with France. The Alps are a high mountain range running across the central-south of the country, comprising about 60 % of the country's total area. Among the high peaks of the Swiss Alps, the highest of which is the Dufourspitze at 4,634 metres (15,203 ft), countless valleys are found, many with waterfalls and glaciers. From these the headwaters of several major European rivers such as the Rhine, Rhône, Inn, Aare, and Ticino flow finally into the largest Swiss lakes such as Lake Geneva (Lac Léman), Lake Zürich, Lake Neuchâtel, and Lake Constance